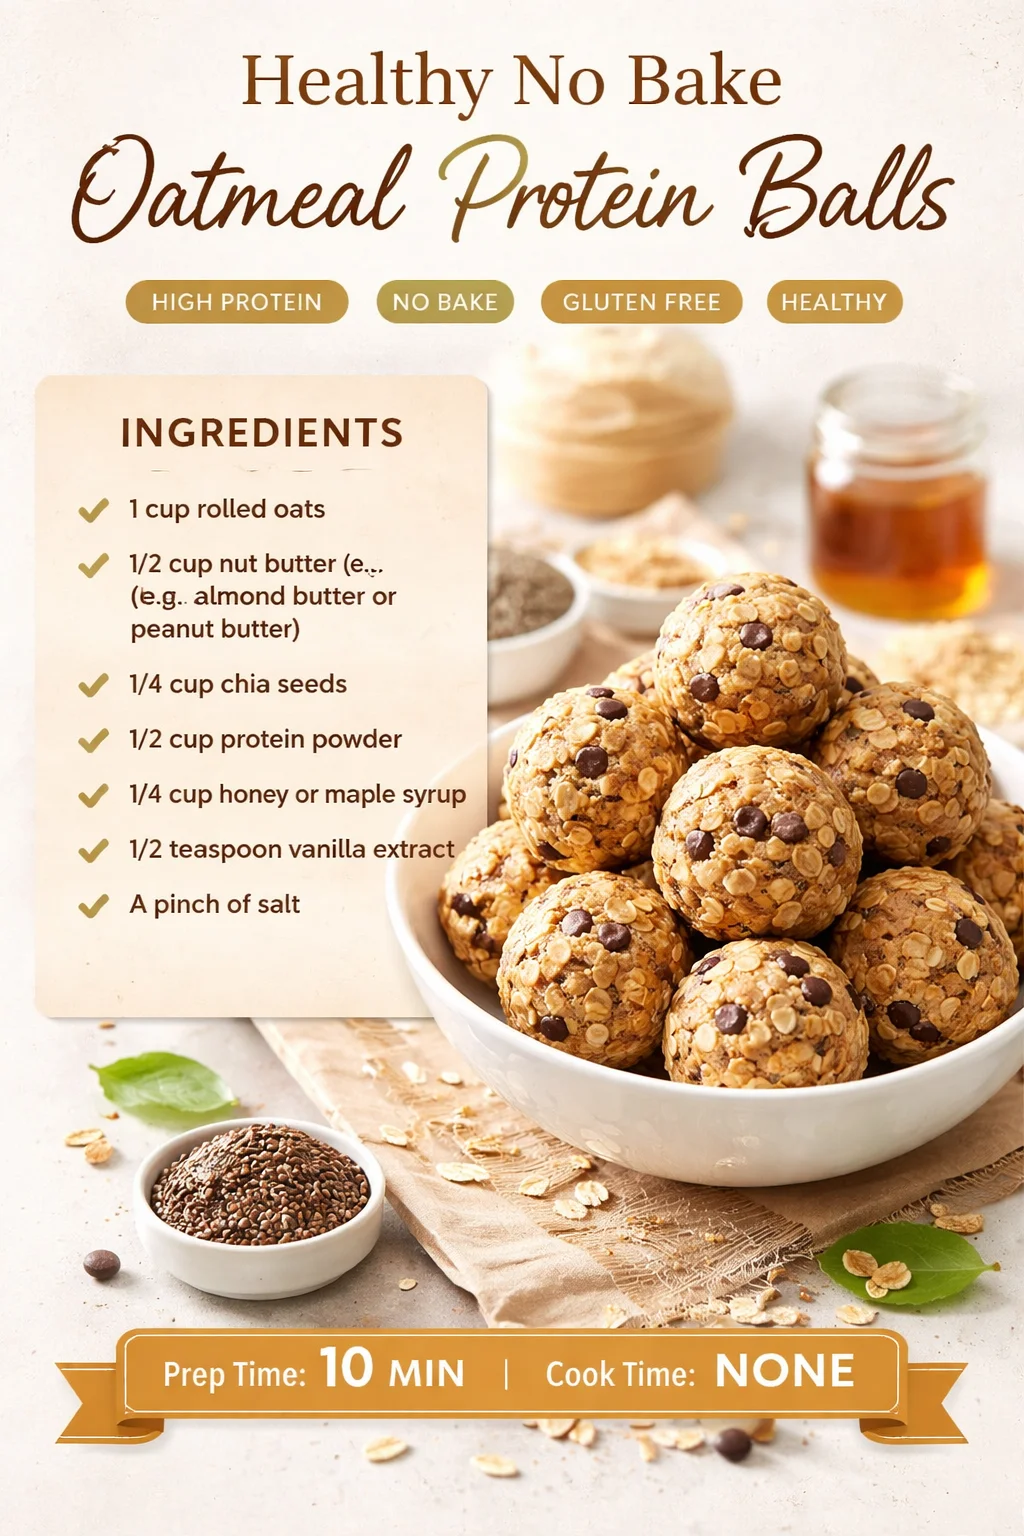
Healthy No Bake Oatmeal Protein Balls
I’ve been making these healthy no-bake oatmeal protein balls for quick breakfasts and post-workout snacks for years — they’re forgiving, portable, and actually taste like a treat instead of "health food." Ready in minutes, they’re the kind of recipe you mix, roll, chill, and forget about until you need a clean, protein-packed bite.
Why you’ll love this dish
These no-bake oatmeal protein balls hit the sweet spot between convenience and nutrition. They’re simple to make, require no oven, and use pantry staples. Perfect for busy mornings, school lunchboxes, or a grab-and-go snack after the gym, they give you fiber from oats and chia, healthy fats from nut butter, and a protein boost from powder.
“A perfect blend of chewy oats and nutty sweetness—my go-to snack when I need something fast and filling.” — a quick fan review
Benefits at a glance:
- Ready in about 10–15 minutes plus chilling time.
- Budget-friendly and customizable.
- Kid-approved texture and flavor.
- No baking means less fuss and no hot kitchen.
How this recipe comes together
Step-by-step overview:
- Combine dry and wet ingredients in one bowl until they bind.
- Adjust texture if the mix is too dry or wet.
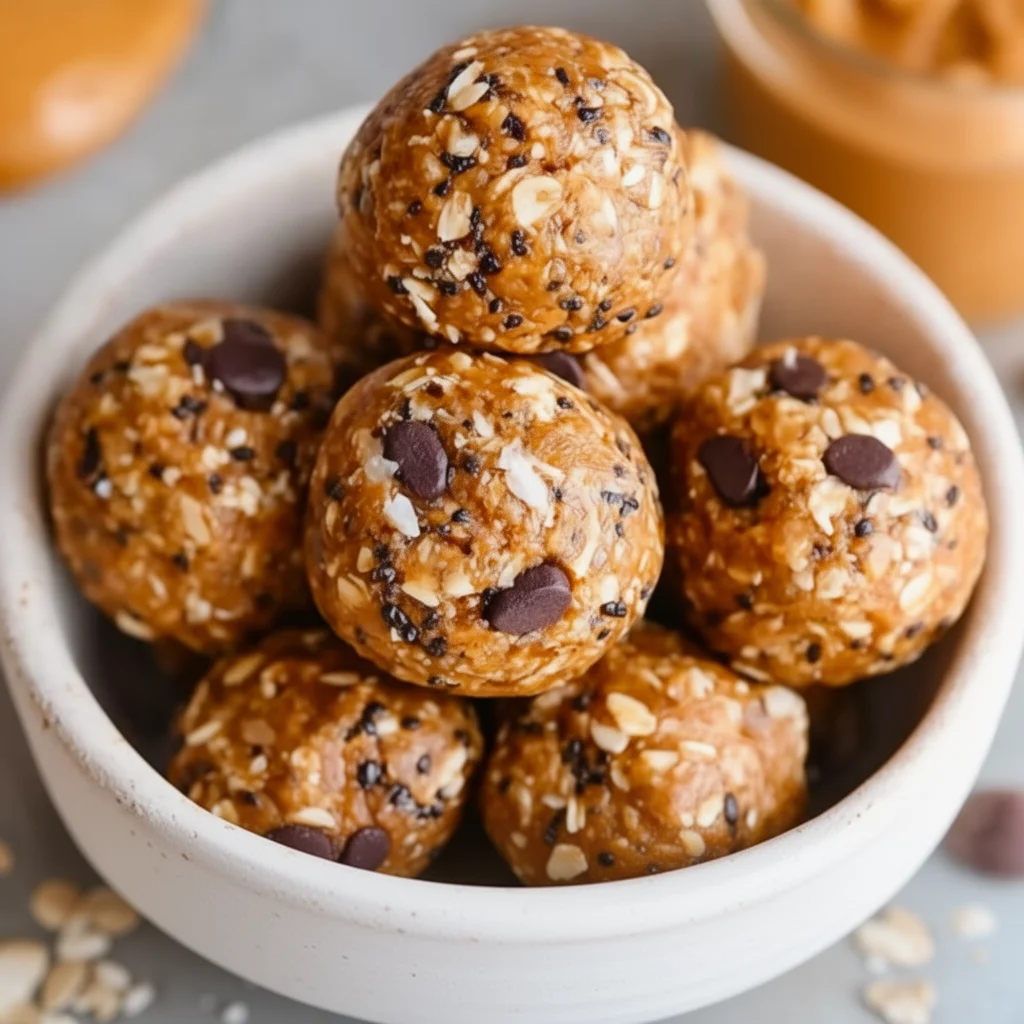
- Scoop and roll into 1-inch balls.
- Chill to firm up.
This is a forgiving, one-bowl process — no special equipment required beyond a bowl, spoon, and measuring cups.
What you’ll need
Key ingredients:
- 1 cup rolled oats
- 1/2 cup nut butter (almond butter or peanut butter suggested) — smooth or crunchy both work
- 1/4 cup chia seeds
- 1/2 cup protein powder (whey, casein, or plant-based)
- 1/4 cup honey or maple syrup (maple for vegan)
- 1/2 teaspoon vanilla extract
- A pinch of salt
Notes and substitutions:
- Rolled oats give the best texture; quick oats will work but produce a softer bite.
- For nut-free: use sunflower seed butter.
- For vegan: choose plant protein and maple syrup.
- If you like a sweeter ball, add 1–2 tbsp of brown sugar or more syrup, but adjust bind accordingly.
Step-by-step instructions
- Measure all ingredients and place them in a large bowl.
- Stir the rolled oats, chia seeds, and protein powder so the powders are evenly mixed.
- Add nut butter, honey (or maple), vanilla, and salt. Mix with a spoon until the mixture starts to come together.
- If it feels too dry, add 1–2 teaspoons of water or extra nut butter. If it’s too sticky, add a tablespoon of oats or protein powder.
- Scoop about 1 tablespoon of mixture and roll between your palms into a 1-inch ball. Repeat until all the mixture is used.
- Arrange the balls on a parchment-lined tray or plate.
- Refrigerate for at least 30 minutes to firm up. They’ll finish setting in the fridge.
- Transfer to an airtight container and store as directed below.
Practical detail: a small cookie scoop makes the size consistent and speeds rolling. Wet your hands slightly if the mixture sticks.
Best ways to enjoy it
- Pack one or two with your coffee for a filling breakfast on the run.
- Pair with a plain Greek yogurt or a fruit salad for a balanced snack.
- Serve alongside a smoothie after workouts — they add chew and sustained energy.
- Arrange on a small plate as part of a kids’ lunchbox with cut fruit and a cheese stick.
For parties, roll half the batch in mini chocolate chips, shredded coconut, or chopped nuts for a more polished presentation.
How to store & freeze
- Refrigeration: keep in an airtight container for up to 1 week. Place parchment between layers to prevent sticking.
- Freezing: freeze in a single layer for 1–2 hours, then transfer to a freezer-safe bag for up to 3 months. Thaw in the fridge overnight or at room temperature for 10–20 minutes before eating.
- Food safety: if using dairy-based protein powders, follow manufacturer storage instructions and keep the balls refrigerated. Discard if they develop off smells or texture.
Pro chef tips
- Texture control: if your protein powder is very fine, you may need a touch more oats to avoid a gummy center. If it’s coarse, more liquid helps bind.
- Flavor layering: lightly toast the oats in a dry skillet for 3–4 minutes before cooling for a nuttier flavor.
- Consistent sizing: use a 1-tablespoon scoop for even balls and uniform chilling.
- No rolling option: press the mixture into a lined small baking dish, chill, then slice into bars if you prefer bars to balls.
- Allergy note: always check jar labels for cross-contamination warnings if serving to someone with severe allergies.
Creative twists
- Chocolate peanut: add 1–2 tablespoons cocoa powder and roll in mini chocolate chips.
- Fruity twist: fold in 2 tablespoons chopped dried cherries or cranberries (adds chew and sweetness).
- Coconut-Almond: swap half the oats for unsweetened shredded coconut and roll in coconut flakes.
- Espresso boost: add 1 teaspoon instant espresso powder for a coffee kick.
- Pumpkin spice: mix in 1–2 teaspoons pumpkin spice and use maple syrup for a seasonal flavor.
- Lower sugar: replace honey/maple with mashed banana (note: makes balls softer and reduces fridge life).
Common questions
Q: Can I use quick oats instead of rolled oats?
A: Yes. Quick oats will work, but the texture will be softer and less chewy. Rolled oats give the best bite.
Q: How long do they need to chill?
A: At least 30 minutes in the fridge to firm up. If you want firmer balls, chill 1–2 hours.
Q: Can I bake them instead of chilling?
A: This recipe is designed to be no-bake. Baking will dry them out and change the texture. If you prefer bars, press into a pan and bake very briefly, but test first.
Q: What protein powder is best?
A: Whey gives a creamy taste and good bind; plant proteins (pea, rice) work fine but can be drier—add a touch more liquid. Choose unflavored or vanilla to control sweetness.
Q: Are these safe for kids?
A: Yes, generally — just watch nut allergies and honey for children under 1 year (do not give honey to infants under 12 months).
Conclusion
These Healthy No Bake Oatmeal Protein Balls are a fast, flexible solution for weekday breakfasts, kid snacks, or post-workout refueling. If you want more no-bake energy-bite inspiration or variations from other creators, check out this The Healthy Maven no-bake oatmeal protein balls recipe and this helpful roundup of energy bites at Gimme Some Oven no-bake energy bites.
No-Bake Oatmeal Protein Balls

Ingredients
Main Ingredients
- 1 cup rolled oats Best texture; quick oats can be used but produce a softer bite.
- 1/2 cup nut butter (almond or peanut butter suggested) Both smooth or crunchy work.
- 1/4 cup chia seeds Provides fiber and nutrition.
- 1/2 cup protein powder Whey, casein, or plant-based can be used.
- 1/4 cup honey or maple syrup Use maple syrup for vegan option.
- 1/2 teaspoon vanilla extract
- a pinch salt
Instructions
Preparation
- Measure all ingredients and place them in a large bowl.
- Stir the rolled oats, chia seeds, and protein powder so the powders are evenly mixed.
- Add nut butter, honey (or maple), vanilla, and salt. Mix with a spoon until the mixture starts to come together.
- If it feels too dry, add 1–2 teaspoons of water or extra nut butter. If it’s too sticky, add a tablespoon of oats or protein powder.
- Scoop about 1 tablespoon of mixture and roll between your palms into a 1-inch ball. Repeat until all the mixture is used.
- Arrange the balls on a parchment-lined tray or plate.
- Refrigerate for at least 30 minutes to firm up. They’ll finish setting in the fridge.
- Transfer to an airtight container and store as directed.